Thursday 11 September 2014

All you need Jammies from Heidi and Finn


This is going to be a short post but that in no way reflects on the pattern…I love it. I was part of the pattern test for Heidi and Finn’s ‘All you need jammies’ last week and made two pairs of Jammies in no time. The pattern was released yesterday (yes, I’m bit late on the old blog).

If you don’t know Heidi and Finn check out their Etsy shop – there are some great patterns for  cool, practical kid’s clothes. All available in downloadable PDF’s…for my clothes I’m starting to prefer the old fashioned paper patterns that you don’t have to spend all evening trying to print out and piece together but for kids clothes there are hardly any pieces so it’s fine.

Here’s the Jammies…


This is a really easy pattern to sew up and it comes with a gathered top/nightie too…S loves her cat jammies so much she wants to wear them as day clothes. When you don’t have a massive amount of money to spend on sewing you want to get pattern that will really work for you so this is perfect, it can be day wear just as easily as night wear and the pattern goes up to age 12 so it’ll be a real staple for me.

I made a shortie set too, the striped fabric is an old t-shirt I recycled and the blue an off cut from a top I made myself…more free clothes! S just started school so no pics of that one...I know when not to push my luck!!


I've decided S has plenty of clothes so going to make some things for me now...and start on the odd Christmas present...did I just say that in September!?

Saturday 16 August 2014

How to make a Mara Blouse from an old shirt


 When Marte from Compagnie M selected me to be part of her 'Mara Blog action' I was really pleased...it was about a year ago that I did the original pattern test, before she launched the final pattern and I wanted to see how far my sewing had come on since then. Also it's a really cute pattern and S has grown out of the first one I made.

As I'd sewn it before I wanted to do something a little different, but still make something that was true to the original pattern, so I made this an upcycling project. Here's what I started with....
I bought this shirt to wear to my interview for teacher training...it was something I thought a teacher would wear, not something I would wear...or something I have worn more than a handful of times since, it also doesn't fit very well and has a stain on it...it needed to be made useful again!

It was a really simple make. I unpicked the ties from the front and used the Mara pattern pieces as they were, remembering to remove the seam allowance from the central part of the yoke piece. My blouse also already had pintucks in so I removed the excess from the lower bodice pattern piece cut them out of the shirt whilst the buttons were done up (treating it as one piece of fabric). Then I assembled it as the instructions suggest.

Space Cadet


 I added a bit of colour with some orange trim around the yoke and finished the arm holes with some broderie anglaise that I had.

 Then I added a little thread loop to each side and used one of the ties I removed from the shirt as a  belt. If you are making one from a different shirt (without ties) there would be plenty of fabric left in the sleeves of the shirt to make the belt and make bias for the arm holes, you don't need the trim if you don't have it, but it does look pretty!


The only real change to the pattern that I made was to lengthen it to a tunic length (that way I could use the original hem of the shirt = less sewing) and also because this version buttons all the way down I could take in the sides a little at the top to get a more fitted look without it becoming difficult to get on and off.

So there you go - a really quick and easy project which was freeee (once you have the pattern which is a very reasonable 7euro). Want to make one? You can can get 10% off the pattern price if you use the code MARA-ACTION.

Not sure what this face is about but at least you see the full finished tunic...


 See more lovely Mara's here.


Wednesday 4 June 2014

You and Me sew along dresses


 I'm sewing along with a blog series this week. Jenya is running her first blog series over at 'While she was sleeping' called You and Me.  Bloggers are sharing what sewing means to them and how sewing clothes for their children feeds into their relationship with them; and at the same time making items for both of them to celebrate this. I know S is proud of my sewing and likes to tell people that I've made clothes for her, she also like to see herself in the picture on my blog! It's part of my identity as far as she's concerned, the other day I said I'd try and put her bike seat up and was told "No Mummy, you do sewing, not bikes!"...she's right of course!

To consider what having homemade clothes might mean to her as she grows up I thought back to my favourite clothes as a child. Unsurprisingly the clothes I remember are the ones I have photographs of myself in...S will be spoilt for choice from that point of view as she so often stars in blog photo shoots!

Me in my party dress ag 5
Here is a picture of me in what I know was my favourite dress when I was only a little older than S. This is my 5th birthday, S just had her 4th this week. The colours are a little odd in this old photo but it was grey with forest green polka dots and and green ribbon. The memory doesn't stop at the photo, I remember beyond that..I can recall the feel of the jersey, it's weight, the way the hem was slightly rough on my leg, the silky ribbon on the neck as it flapped up onto my neck when I ran, the feel of the cuff around my wrist. I loved it.


The way the photo unlocks the memory makes me glad I take so many pics of S in her homemade clothes. I am sure the photo's that will spark the most memories for her as she grows older will not be the posed ones, but the ones taken at family events and landmark occasions like these photos of me. With this in mind I made her a dress. I had hoped she might wear it at her birthday party but she opted for leggings and a t-shirt, with a reindeer outfit over the top instead! She is planning to wear it to a wedding we're going to as a family next month instead though.

My big Sis, Mum and me sometime in the mid 80's

Here's a pic of me, my sister and my Mum at a wedding in very traditional printed cotton dresses. I was inspired by this to make a printed cotton dress for S. At first I thought I'd draft something with a sailor style collar and pleating but I bought this Michael Miller On Parade printed cotton online from Daisybuds and when it arrived the print was larger than I had thought (the perils of online purchasing- and not paying attention to the tape measure on the pic!)...I needed something cleaner and simpler than my design so I made this pattern from Burda mag 04/2014. I used the hemline print as inspiration for my creation; you can't see from this pic but the print has pink apples around the hem on the dresses my sister and I are wearing.


It's lined in pink cotton lawn and trimmed in pink polka dot bias binding. It's way more cutesy than we usually go for but this project is about nostalgia for me... and that wonderful, but odd feeling of experiencing events I remember as a child but this time seeing them through the eyes of a mother; liek going to a wedding.


 I had planned to make myself an outfit too but I ran out of time (and money). I definitely won't be wearing an 80's check number with red leather belt to the wedding though...sorry Mum!


I made a funky version of S's dress for our holiday too which started as a wearable toile (muslin) but I love just as much...


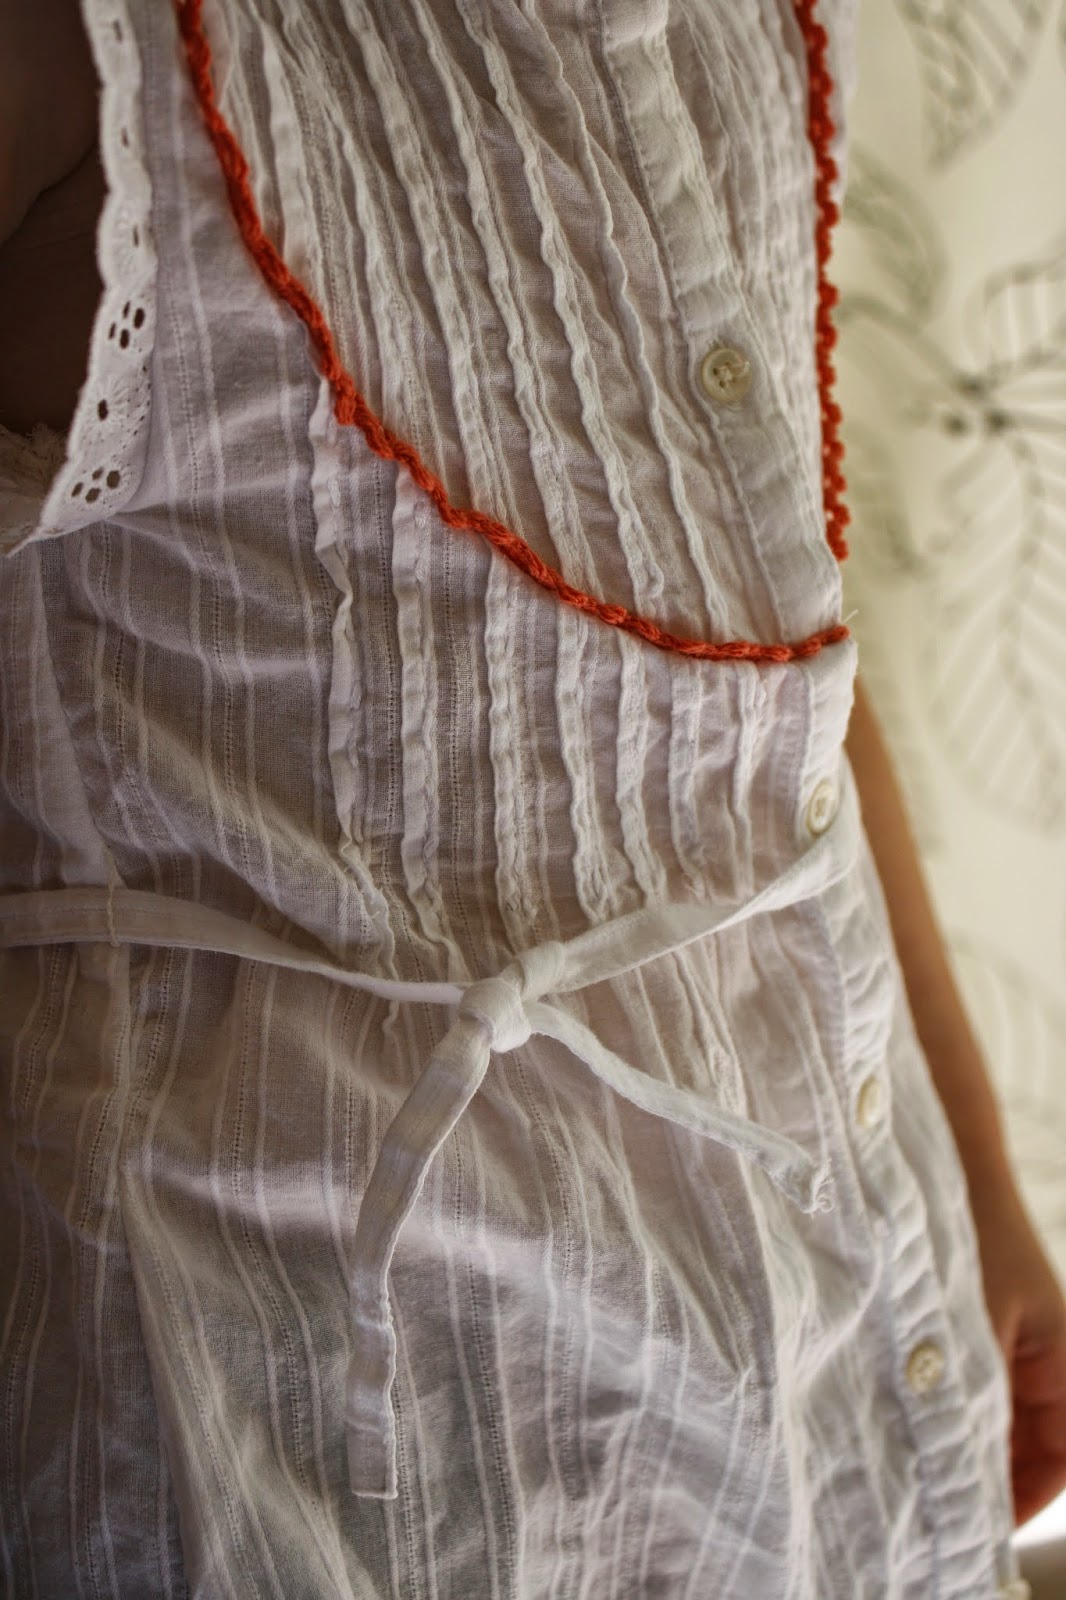
See how the facing pokes out here - that's why I lined the final version!


Neon orange bias binding to finish the hem.

Monday 12 May 2014

Tie-dye 'Beach' Mulberry Tunic and cut off jean shorts


Even though it’s raining and windy outside we’re feeling summery in the losing my thread household. We have booked a little summer break and are looking forward to heading off to the British seaside next month. With that in mind I made S some beach clothes…


First up… after testing the Willow and Co Ash jumpsuit I had to try one of the other patterns from the Wanderlust collection. Now that I have a little boy I thought I’d take a look at some of the unisex patterns and went for the Mulberry tunic designed by Olga from Kid Approved. There are some other Mulberry tunic examples here and here from other bloggers.

 I wanted something S could throw on at the beach after a dunk in the sea so I bought some terry towelling on ebay. White was a bit boring so we tie dyed parts of it purple; making a concertina from the fabric first and then tying elastic bands tightly round before dunking it in Dylon dye. I dyed the fabric rather than the finished garment which meant I could get some nice contrasting panels. There are a lot of nice details in this pattern like the back yoke that extends over the shoulders which look great in a contrasting tone.


I have been waiting for some time to use this neon pink bias binding! Kerchow! Actually applied the bindng incorrectly, not the fault of the instructions but my printer ran out of ink so I couldn’t see the picture properly and I only figured it out afterwards, never mind - it looks okay! I made a size bigger than the size chart as I wanted it to fit over other clothing (and also I’m hoping it’ll fit next year too).

I topstitched in pink...wish I’d used white now. The topstitching looks a bit wonky in the middle – it was tricky to get to lay straight, I think it's because the pattern is not designed for such thick fabric and the construction in this part has stitching through 5 layers, so getting the perfect finish with towelling was tricky, but it doesn’t matter. We like it!

I left the neck opening, opting against using buttons and used an embroidery stitch to finish the edging on the neck, hem and sleeves. I think it works well with the towelling but my husband thinks it is too open. Let me know what you think… I used an overlocking stitch to put it together so the seams are finished but not too bulky.

And now for the shorts...

To go with the hoody I made cut off denim shorts from some jeans S has grown out of. I frayed the edges with a quick unpick (it was chilly when we went ot the park so she didn't wear them together for our photo shoot). 
 
There’s a blog series which just finished on Elegance and Elephants called 'Let the kids decide', designed to encourage makers to let their children to have a creative input into their clothes…Normally S has very strong opinions on what I make and what she puts on in the morning so she is heavily involved anyway (she won’t wear it otherwise!) but I wanted to include something solely her idea in the project. I was thinking of a floral pattern for the shorts but I asked S and she suggested waves which was much better than my idea! Ironically I missed the deadline for that event because she decided not to pose for photos (oh well!).  


I used a stencil cut from card and decolourant paste to create the pattern and then picked out details with a Sharpie pen. Find out how to use the paste here on vera luna’s blog that’s where I found out about it! I was disappointed at first because it didn’t come out with as much of a contrast as I had thought it would but the more I get used to it the more I like it.
Just after the decolourant is applied

Not without mistake but at the end of the day it’s just something fun to put on at the beach and it was fun to make too. Can’t wait for our holiday now!


Wednesday 30 April 2014

Liberty Summer Concert Tee for Selfish Sewing Week


This week is selfish sewing week. A week of sewing led by blogger Imaginegnats on Kollabora in which you sew projects for yourself instead of your children. When S saw the T-shirt I made myself she said “But…I wanted that material for my dress!”; I didn’t realise she had secret plans for my stash...I needed to get some selfish sewing in and quickly!

Having recently been pregnant and having had a baby only 8 weeks ago I haven’t really felt like sewing for myself. My body shape has been changing so quickly it felt like a waste of time. I remember after having my first baby I invested in new clothes in the first few weeks after having her (somehow maternity clothes didn’t feel right to wear) and within a couple of months my new wardrobe was huge on me. So this time I’ve hung onto the maternity wear and held off of sewing for me. But it is selfish sewing week so I decided to give it a go and I’m glad I did.

With a rapidly changing body shape and a need for easy access (for feeding), plus a need for a garment that washes well (for baby sick) and needs little/no ironing (for sanity) it seemed like a jersey garment was the best option. I recently bought a load of jersey from C and H fabrics in Winchester including some Liberty print jersey so I set to work. A few months ago I also bought the Perfect Pattern parcel #1 so I used the Summer Concert Tee pattern from Dixie DIY. This bundle is no longer available but keep your eyes peeled as Parcel #3 goes on sale at the end of May. 


I have always steered clear of knit fabrics but recently I took the craftsy course led my Meg Mcelwee from Sew Liberated, it really boosted my knowledge and even though things went wrong at least I had an idea why!

I LOVE the Summer Concert Tee pattern and will definitely make another;  it’s really flattering and perfect for feeding baby in. I would not normally wear something this patterned but I bought this Liberty print from a remnant bin and I really enjoying wearing the finished piece. 


Because I made the Tee from a remnant I only had 1 metre and had to be a bit creative when cutting out, going against the grain for some panels, but it’s a very drapey jersey so it works reasonably well (Can you tell?). The drape of the fabric caused me problems with sewing, it didn’t like a zigzag stitch at all and kept getting chewed up, even with the foot pressure on it’s lowest setting and with a walking foot. In the end I found a triple stretch stitch worked a lot better, but that was after battling with it for ages. Originally I had a sagging neckline too (caused by not stretching the neck piece enough along the front), I didn’t think the fabric would survive unpicking and re-sewing so I turned it in and hand stitched it on the inside, it’s a bodge but it works! 


The best news is that it passed the key test…a humungous baby sick and subsequent wash! I think it’s my new favourite tee.